Sunday, February 28, 2010

At last!

I may have waited until the last day of the month to successfully complete our New York Beauty block, but I am sure Jennifer will be glad that I did. After the first epic FAIL of a block, I decided I needed to make another test block. I did that, yesterday. It was much more successful. So, I cut into Jen's excellent fabric and came up with this:

New York Beauty Block

Thursday, February 25, 2010

Jen's New York Beauty

I started and finished my block last night. I was putting it off, for some reason I was nervous. I didn't do a test block as several years ago I completed piecing a queen sized quilt top with a simple New York Beauty block so I figured I would just wing it!

Since I only had to make 1 block I thought I would try to chose a fairly detailed design. I love how it turned out, Hope you like it too!

Pattern from the book pictured below.


Here is a photo of my 7 year WIP. Thought you might like to see why I decided to wing it. I now have a love hate relationship with the New York Beauty (mostly love though!)
 

Wednesday, February 24, 2010

absenteeism

Hi.  Sorry for being completely absent from the blog in my month of block swapping.  We're hunting for a new apartment-- a fruitless labor-- and so that's sucking up all my internet time.

There have been lots of questions about block sizing, etc.  I was shooting for 8.5" unfinished, but if you're in the ballpark, I'll be fine.

All the blocks I've seen so far have been amazing.  I've even received one in the mail!  I'll take a photo of all of them together once I've received each block.

I'm ready for March-- what are we making?!

Fait Accompli

For February!
Ze block:
Which actually, oddly, stunningly and incredibly enough-measures 8.5" x 8.5".
I think I entered a worm hole when I put this together!
LOL

Jennifer, I love pulling colors together in a cohesive way, and I think the floral fabric pulls it off nicely.  Plus, I'm hoping the lighter blue matches the blue Suzanna chose for hers.

As soon as this blankity, blank, blank cold is under control, I'm off to the post office!
Snowing icicles and snowcones here!

Monday, February 22, 2010

made in New York

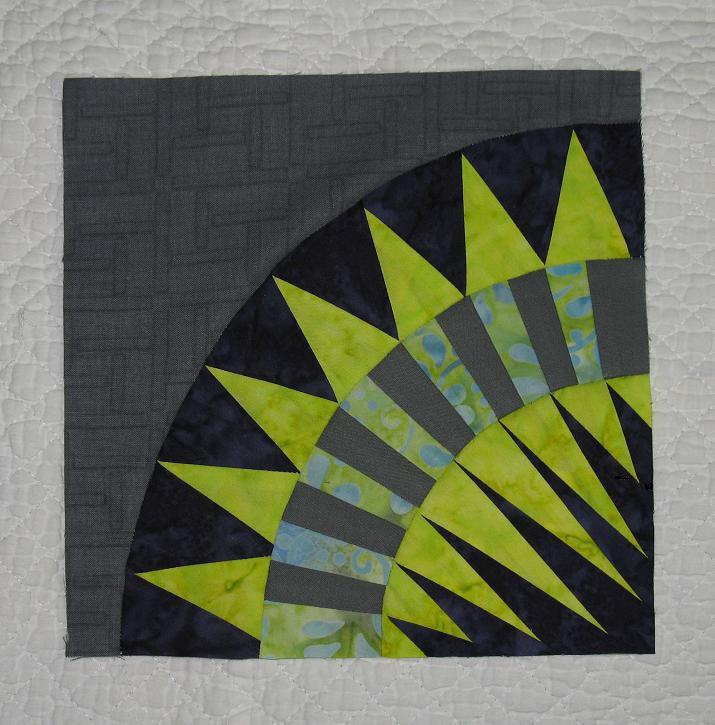
So, i'll admit feeling a little pressure to do well with this block.  I mean, not only did all of you make awesome blocks for me, but this is a New York beauty, and I'm the bee member living in NY...

Jen, I'll be honest, this was quite a challenge.  But at the same time, i really liked flexing my quilting muscles and seeing if I could figure it out.  I ended up really liking both the block and paper piecing.  I've always loved piecing curves and I have a pretty pink & red fan quilt sitting in my UFO pile.  This month I learned that curves aren't too tough to tackle even when I don't have tons of time to sit and sew.  Thanks!

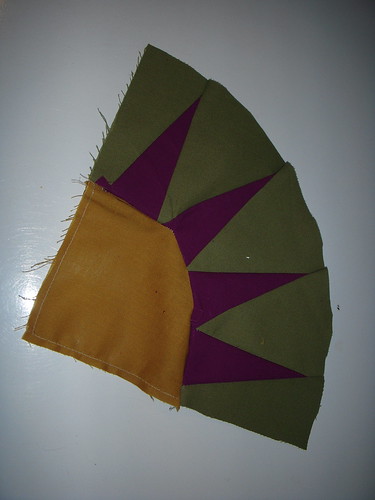
Here's my test block:

I found the pattern online here:  Donna Duquette's New York Beauty Block Patterns
The pattern said it would make an 8"x8" block, but that is actually the unfinished size.  Thank goodness for test blocks, right?  I solved the size problem by enlarging only the background pieces so Jen can cut it down to size when she assembles the top. 

This was fun.  I'll get it in the mail some time in the next few days. 
Who's ready for March?!

Friday, February 19, 2010

Testing One. Two. Three.

Jennifer, my dear, here is the test block.  It came out 8 1/4 x 8 1/4 no matter how hard I tried to finagle it larger.  Do you want me to shoot for the 8 1/2 x 8 1/2, or keep the original size?

I can try again.
Just let me know.
Thanks!

Thursday, February 18, 2010

Jennifer. Dahlink!

Little help here:
unfinished, what are the measurements for the NYB?
finished, what are they?

Redundant, I know, but if you only knew my poor lil' pea brain.

Thank you ma cherie.

Wednesday, February 17, 2010

Another New York Beauty

My test block went together 1-2-3 and I thought to myself, this is so much fun.
Alas, the real thing proved much more difficult. Effective cropping of the photo makes the block for Jen look more accurate than it really is. The block doesn't lay perfectly flat, and there's an edge or two that almost makes it to 8.5 inches. You'll notice my test block uses regular quilting fabric


whereas Jennifer's block is constructed with batik for the two concave arches (dark purple and chartreuse), and I can't help but wonder whether the lack of give in the batiks contributed to my troubles. On a positive note, I think the block looks way better in real life, where the colours are much richer than they appear on the screen.
The finished block and leftover fabric will hit the mail tomorrow.

Jennifer's NY Beauty

Here's Mz. Jennifer's NY Beauty block right before going into the envelope as I send it off to her.  I'm not even showing you the practice blocks I made for this one.  Suffice it to say I am learning new words and new things about myself...


I actually can't wait to see this quilt all done as I like the overall idea of these spiky blocks and I really like Jennifer's color palette.  It's just constructing the blocks that isn't so likeable so this was a great way to get an almost completed quilt.  Smart lady!  Hope you like your block.

Thursday, February 4, 2010

Bulky Center Intersections

which could cover both quilting and our hopefully shrinking waistlines!

Remembering the trouble some of us had in getting our center intersections to lie flat with so many seams coming together, found this today and remembered I forgot to post a "how to" to help.  From Connecting Threads:

Pressing tip: You’ll end up with a lot of bulk at the center intersection, so before you press, carefully using a seam ripper, pick out 2-3 stitches from two of the seams, on the seam allowance side. This will allow you to open up the center to form a teeny tiny pinwheel on the backside. Finger press this open until you are happy that the bulk is removed. Now you can iron it open. The rest of the seam can be pressed to the dark side like all the others. As you press, don’t move the iron around too much or it will twist your beautiful center.


Hope this helps as we merrily go along!


..

Monday, February 1, 2010

NY Beauty test block

It came out too small! I was too lazy to measure my template to make sure it was to scale. Anyway, here it is:

New York Beauty test block

And the back in all it's glory:

back of NY Beauty


I really struggled with the rays. I either cut my wedges too big or too small and found that they need to be fairly accurate in size or else it's hard to know where to place them.

I didn't have any trouble with my curved seams though. I pinned like crazy and sewed right over my small applique pins.

First Try


New York Beauty ... Almost


Here's my first attempt at New York Beauty. Piecing the arc was very easy and it turned out almost perfect. The curve was a completely different story. I followed the common process of clipping and pinning, etc, but it got all bunched up. Help me out-- what's the smoothest way to piece a curve?

Just so you know...

 
broken dishes quilt block Originally uploaded by sonnetofthemoon 

Modify Tradition Round 2 has started. We're still focusing on teaching you how to make traditional blocks, but instead of a sampler quilt, each block will feature a special project tutorial and a giveaway. Head over to see how to make Broken Dishes now!